WPML can read a configuration file that tells it what needs translation in themes and plugins. The file is named wpml-config.xml and it’s placed in the root folder of the plugin or theme.
On This Page:
- The purpose of the language configuration file
- Generating the wpml-config.xml file automatically
- Structure and Syntax
- Using WPML language configuration file with child themes
Purpose
As part of achieving compatibility with WPML, you should also create a configuration file that will help you with maintaining compatibility in your future releases. WPML can translate anything on your WordPress site, but you need to tell it what needs translation. This file does that.
Go to the WPML → Settings page.
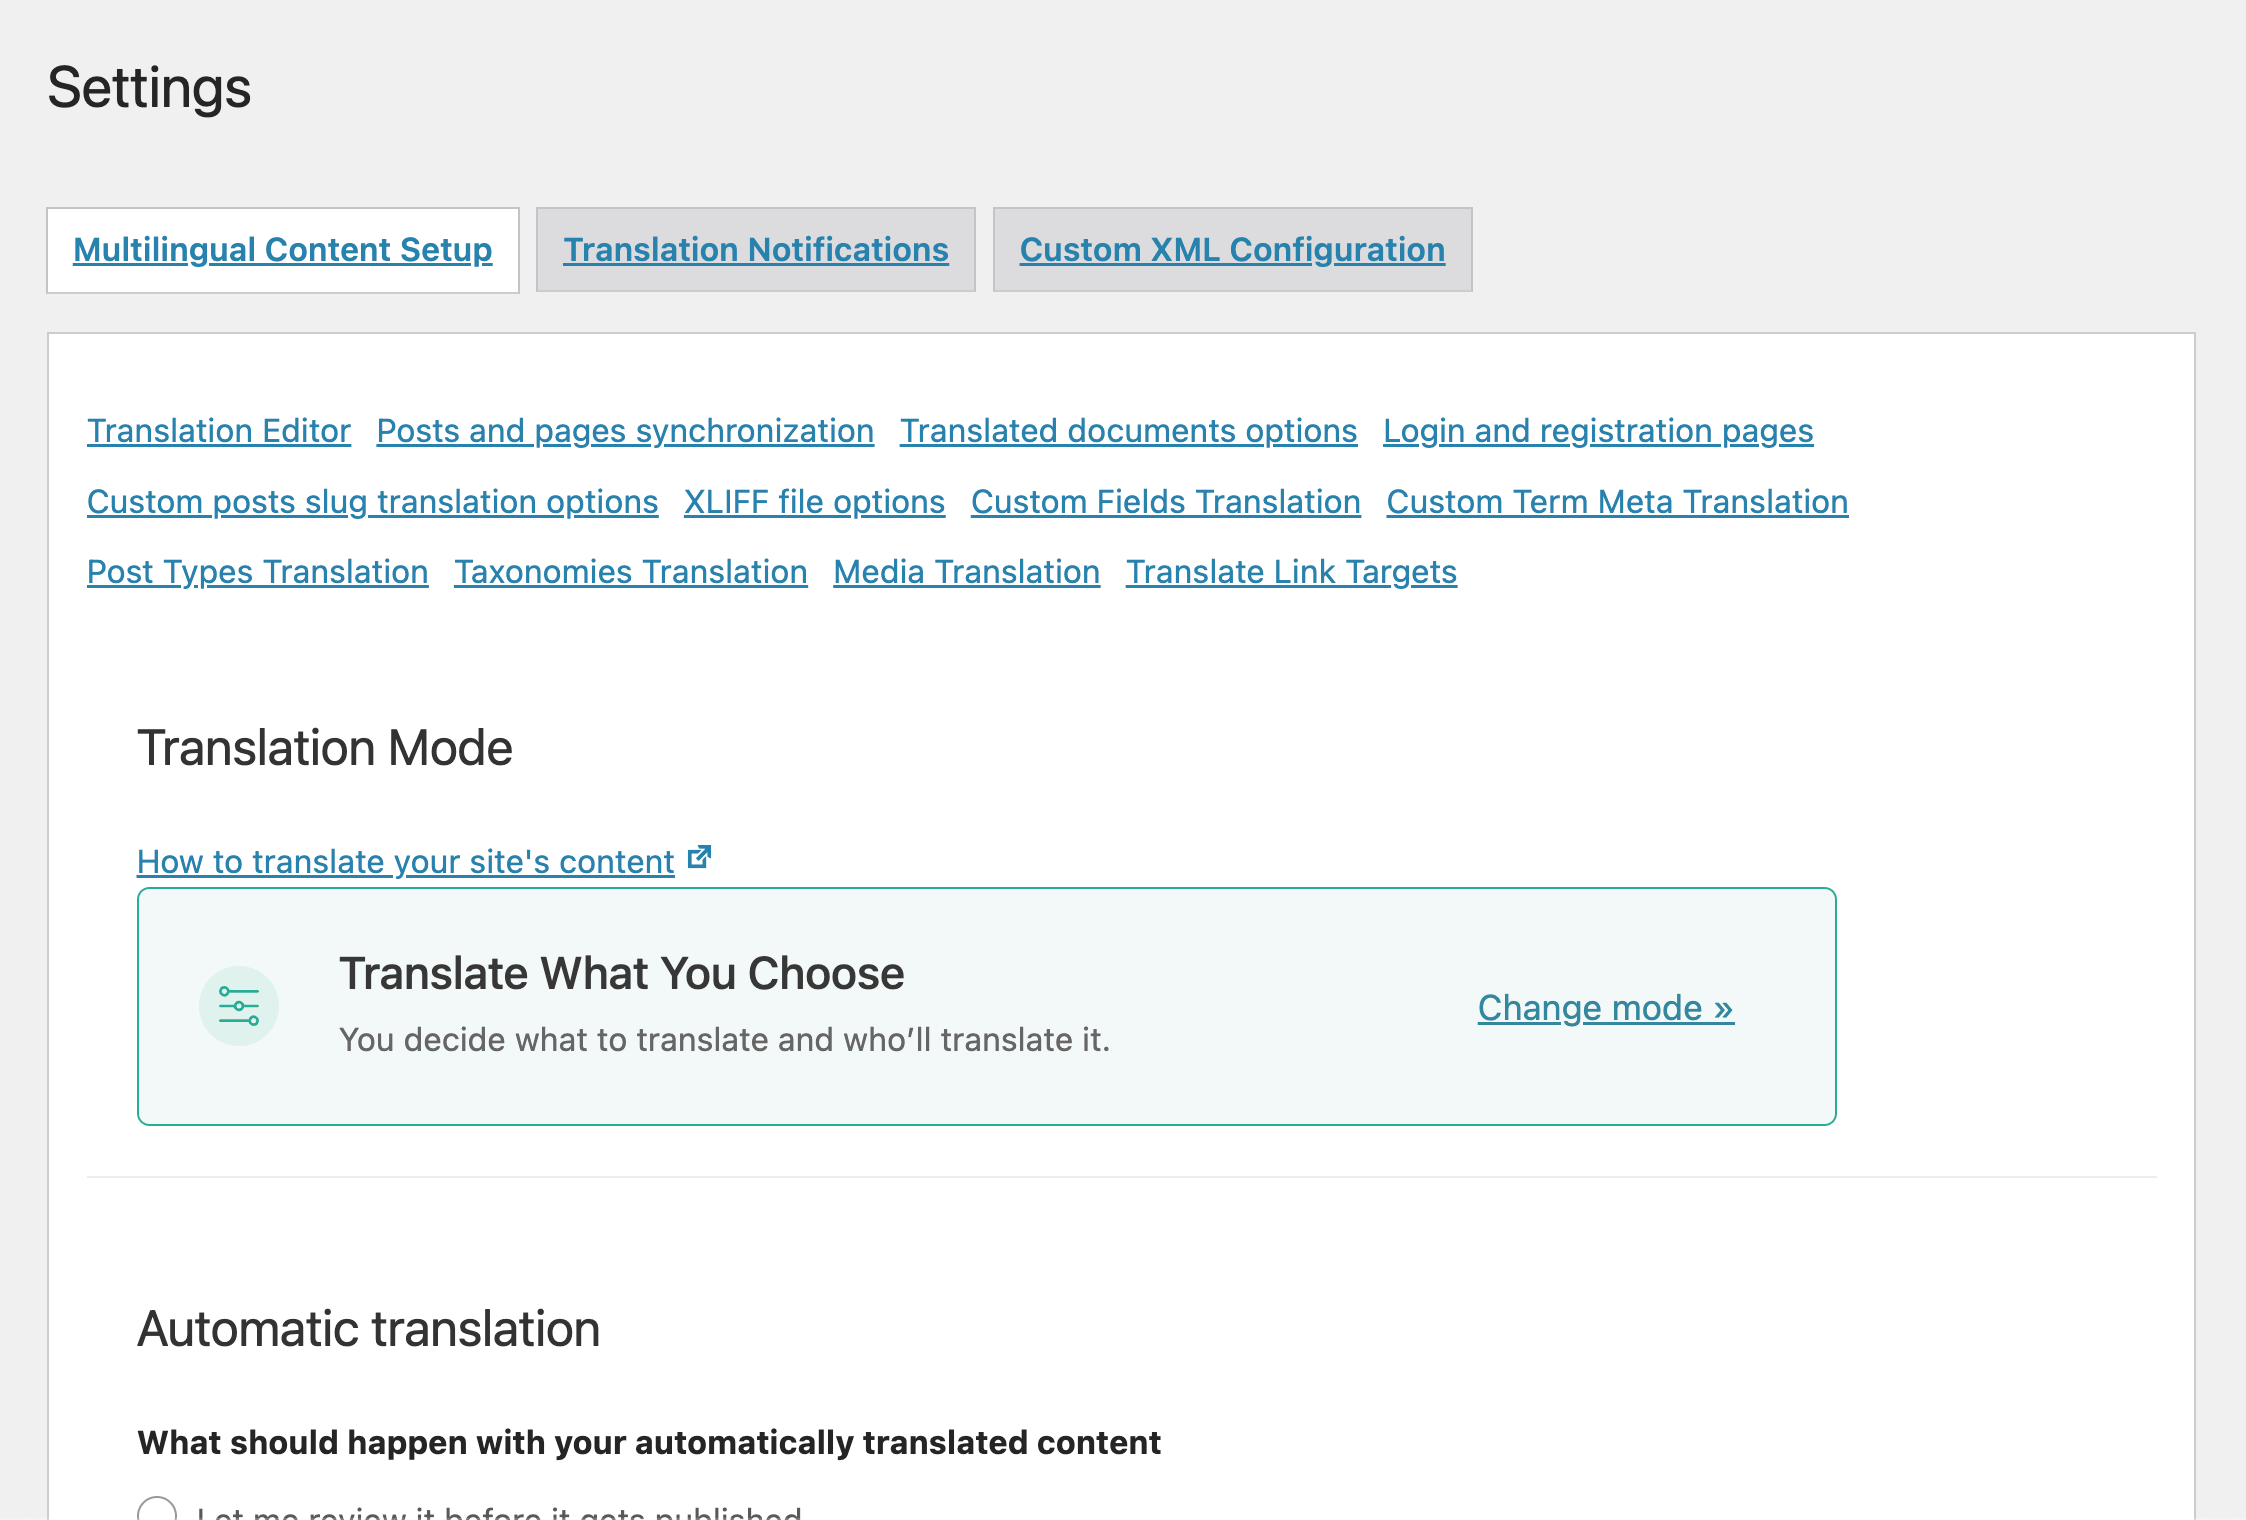
This page tells WPML everything it needs to know, including which custom fields to translate or synchronize, which custom post and taxonomies should be multilingual and even which admin texts to translate.
The language configuration file includes this information so that each and every user doesn’t need to manually enter it in the admin page.
For some of the themes and plugins, we are hosting the language configuration files on our servers. You can see a list here. It is set to override the local language configuration file that is placed inside the root folder of the theme or plugin.
WPML also allows you to manually override any settings loaded by theme and plugin language configuration files. This applies to both, language configuration files inside the root folder of the theme or plugin and the language configuration files hosted on our servers.
Generating the wpml-config.xml file automatically
If you are not familiar with creating XML files, our team has created the Multilingual Tools plugin that makes this task easier. Although it was initially conceived as a tool for helping theme and plugin authors to make their products multilingual-ready, it can easily be used to generate your own wpml-config.xml file.
To learn more about generating your wpml-config.xml file, visit the Multilingual Tools plugin’s page. Specifically, look under the How do I generate language configuration files using Multilingual Tools? section.
Once you have the configuration file, add it to the root of your theme’s folder. If you already have one, do not overwrite it. Instead, edit your original XML file and add the code generated with the Multilingual Tools plugin.
Please note that this plugin is not intended to be used on the live, production sites.
To read this tutorial and build language configuration files for your themes and plugins, you can start with this example one – wpml-config.zip.
You’ll need to edit it, but you can use the sections and structure of this file.
Structure and Syntax
The content of the wpml-config.xml file has to be wrapped into these tags
<wpml-config>
and
</wpml-config>
Currently, you can configure the following data and translation settings in this configuration file:
- Page builder content
- Custom fields
- Custom terms
- Custom types
- Custom taxonomies
- Gutenberg blocks
- Admin texts / wp_options
- Language switcher configuration
1. Shortcodes and page builder content
WPML allows you to use the wpml-config.xml file to define shortcodes that need to be added to content translation.
In the examples below, we show you how to register page builder shortcodes. You can use the same code structure to register all types of shortcodes for translation.
1.1 Translate strings
Let’s consider an example where you have a text separator added to a page using Visual Composer. That separator has a title, and its shortcode looks like this:
[vc_text_separator title="Separator Title"]
In order to translate this text separator’s title, we need to add a few lines to our wpml-config.xml file. This way, WPML will “know” that the title of that separator needs translation. This actually follows the very same logic as the one used for the custom post types, custom fields, and others.
The following code is an example of what we need to add to the wpml-config.xml file in this case.
<wpml-config>
  <shortcodes>
    <shortcode>
        <tag>vc_text_separator</tag>
        <attributes>
            <attribute>title</attribute>
        </attributes>
    </shortcode>
  </shortcodes>
</wpml-config>
Let’s go through the structure of the above example:
- Start with the shortcodes tag. Any shortcodes in your site that need to be translated should be put under this tag.
- Then use the shortcode tag to wrap all the tags belonging to one, single shortcode.
- The tag called tag is used to define the name of the shortcode. In this case it is the vc_text_separator. You can add option custom labels to display in both the Advanced Translation Editor or Classic Translation Editor. These labels are also included when exporting to XLIFF files. See the below example on tag and attribute labels.
- Shortcodes can have one or more attributes, so we wrap them in the attributes (plural) tag and use the attribute (singular) tag to define the title of each attribute.
Page builders include (sometimes) design elements that have link attributes.
You can make internal links automatically point to the translated version of that post using the wpml-config.xml file new shortcode link option: type=”link”.
You can use the encoding attribute with this one. It handles special encoding that various page builders use. The encoding attribute is usually specific to the page builder used. It accepts the following values:
- base64 – Visual Composer raw HTML shortcode. The HTML is stored as a base64 string in the shortcode.
- vc_link – Special link formatting for Visual Composer.
- av_link – Special link formatting for Enfold.
- allow_html_tags – Normally HTML tags are stripped out of shortcode attributes. Set encoding to allow_html_tags if the shortcode attribute should allow HTML tags. This should be used with caution as allowing HTML tags in some situations can mess up the formatting and could be a security issue
<wpml-config>
  <shortcodes>
    <shortcode>
            <tag>av_button</tag>
            <attributes>
                <attribute>label</attribute>
                <attribute type="link" encoding="av_link">link</attribute>
            </attributes>
    </shortcode>
  </shortcodes>
</wpml-config>
If you are thinking about using urlencoded shortcodes, make sure to read page about Translating urlencoded shortcodes.
<wpml-config>
	<shortcodes>
		<shortcode>
			<tag label="My shortcode label">my_shortcode</tag>
			<attributes>
				<attribute label="Shortcode title">title</attribute>
			</attributes>
		</shortcode>
	</shortcodes>
</wpml-config>
Adding labels to tag and attributes allows you to display custom labels in the Advanced Translation Editor or Classic Translation Editor. This can help the translator better understand the context of the string.

1.2 Translate media
You can use WPML Media Translation to translate images in page builder content. This is done by conversion of image IDs and image URLs. It is necessary to tell the page builder that uses shortcodes how to do this conversion. The following code is an example of what we need to add to the wpml-config.xml file in this case.
<wpml-config>
  <shortcodes>
    <shortcode>
        <!-- Convert media IDs in `gallery_ids` attribute, and ignore the shortcode content -->
        <tag ignore-content="1">et_pb_gallery</tag>
        <attributes>
          <attribute type="media-ids">gallery_ids</attribute>
        <attributes>
    </shortcode>
    <shortcode>
        <!-- Convert the media URL in the content, translate some string attributes for `title` and `alt`, convert media URL in `src` attribute -->
        <tag type="media-url">et_pb_image</tag>
        <attributes>
          <attribute>title_text</attribute>
          <attribute>alt</attribute>
          <attribute type="media-url">src</attribute>
        </attributes>
    </shortcode>
  </shortcodes>
</wpml-config>
You can use the following values:
- ignore-content – Can be used within in a tag element. This value is optional and it can be either 0 or 1. You can use this attribute to achieve backward compatibility for new media shortcodes. If the value is set to 1 the shortcode content will not be processed.
- type – Can be used within in a tag element. You can also use shortcode content that contains URL of media as the optional value within media-url.
- type – can also be used within an attribute element. In this case, it can have one of the following optional values:
- media-ids – a comma-separated list of media IDs.
- media-url – URL of media
- link – points to another page of the site and WPML will automatically convert it to the URL of the page translation
1.3 Translate page builder widgets
As of WPML 4.4.4, you can now register page builder widgets within your language configuration file. Please see our documentation page on how to register page builder widgets for translation.
1.4 Automatically converting shortcode IDs
As of WPML 4.5.9, you can declare the IDs of posts or taxonomy terms located in shortcode attributes. These IDs can then be converted automatically on your site’s front-end.
For example, when considering the following shortcode:
[foo_product_list product_ids="12,34,56"]
We can declare that the product_ids attribute is holding post IDs with the following configuration:
<shortcode>
    <tag ignore-content="1">foo_product_list</tag>
    <attributes>
        <attribute type="post-ids" sub-type="product">product</attribute>
    </attributes>
</shortcode>
On the front-end, the shortcode will be automatically converted to:
[foo_product_list product_ids="13,35,57"]
You can use the following configuration attributes:
- type – either post-ids or taxonomy-ids
- sub-type (optional) – can be the specific entity of the type if it’s already known. For instance, product for the Product custom post type. If it’s not defined, the specific entity will be guessed.
The ID conversion is versatile and tries to adapt to most possible formats of IDs (single ID, list of IDs, serialized array, JSON encoded array).
2. Custom fields
The custom field name needs to be provided and also the action that WPML is expected to take: translate, copy, copy-once, ignore.
<wpml-config>
  <custom-fields>
     <custom-field action="copy">quantity</custom-field>
     <custom-field action="translate">custom-title</custom-field>
     <custom-field action="copy">weight</custom-field>
     <custom-field action="copy-once">bg-color</custom-field>
     <custom-field action="translate">custom-description</custom-field>
     <custom-field action="ignore">date-added</custom-field>
  </custom-fields>
</wpml-config>
This block will have to be nested under the <wpml-config> tag.
You can set the following translation options for custom fields:
- translate: allows your user to translate the value of the custom field. These fields are displayed on the Translation Editor screen and can be sent to any of the professional translation services.
- copy: this action copies the custom field value of the default language to the secondary languages. This means that updating the custom field value of the default language will always be copied to the secondary language. The custom fields set to copy do not show on the Translation Editor screen.
- copy-once: The value of the custom field is copied to the secondary language in the initial translation process. The custom fields that use the copy-once action will not appear on the Translation Editor screen. However, the user can change the custom field value of the secondary language to be different from the default language using the post editing screen.It is preferred to set the custom fields that hold settings like background color, font color, font size, and others, to copy-once. This allows the user to have different settings for translated content than the ones set for the posts and pages in the default language. For example, the user wants to set the background color of the same element to be yellow in the default language and blue in the secondary language. Please note that editing a field set to copy-once will not mark the field as needs update. This is because the field will not be copied to an existing translation, it is only copied when the translation is created.
- ignore: this action eliminates the custom field from being copied to the secondary language.
You can add attributes to the <custom-field> tags. These attributes customize the instruction texts in the Advanced Translation Editor or Classic Translation Editor.
- style can be line, textarea or visual, for displaying single line, text area, or WYSIWYG respectively.
- label is displayed next to the field.
- group specifies if the custom field belongs to a group and what the label of the group should be. When a field is in a group:
- The field is removed from the custom field section
- The field is added to a the related group’s section
<wpml-config>
  <custom-fields>
    <custom-field action="translate" style="line" label="Title">custom-title</custom-field>
    <custom-field action="translate" style="textarea" label="Description">custom-description</custom-field>
    <custom-field action="translate" style="visual" label="Some content" group="Custom group">custom-wysiwyg</custom-field>
  </custom-fields>
</wpml-config>
You can also add optional encode attributes to change the encoding from the default value (no encoding). Encoding attribute accepts the following values:
- json
- base64
- urlencode
The attribute allows you to use multiple encoding. In that case, values need to be separated with a comma, e.g. encoding="json,base64".
<wpml-config>
  <custom-fields>
    <custom-field action="translate" encoding="json,base64">keywords</custom-field>
  </custom-fields>
</wpml-config>
When this wpml-config.xml content is used, these custom fields are displayed in the Advanced Translation Editor or Classic Translation Editor, as shown in the following image.
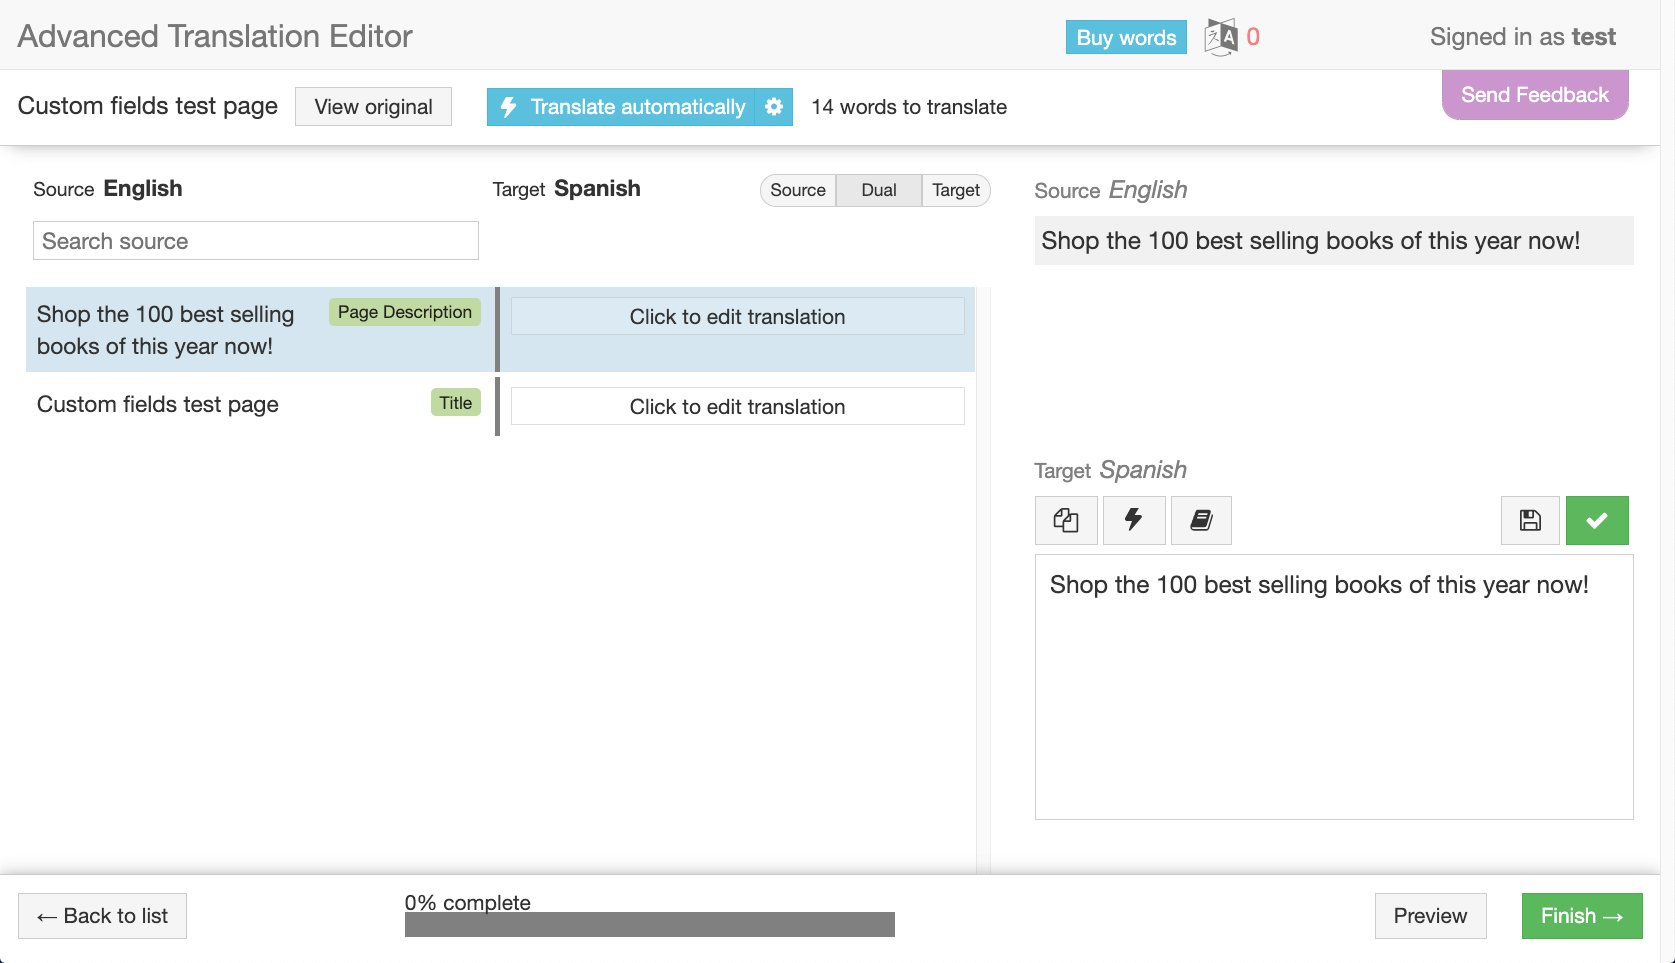
Custom field labels in the Advanced Translation Editor

Custom field labels in the Classic Translation Editor
If your custom field contains a link, you can use the translate_link_target attribute to force WPML to check and adjust links in the custom field.
<wpml-config>
  <custom-fields>
    <custom-field action="translate" translate_link_target="1">name_of_the_acf_field</custom-field>
  </custom-fields>
</wpml-config>
2.1 Translating sub-keys in custom fields
WPML translates all sub-keys in custom fields by default. It is possible to bypass such behavior by specifying which sub-keys should be translated.
<wpml-config>
  <custom-fields>
    <custom-field action="translate">with_attributes</custom-field>
    <custom-field action="translate">with_deep_attributes</custom-field>
    <custom-field action="translate">no_attributes</custom-field>
  </custom-fields>
  <custom-fields-texts>
    <key name="with_attributes">
        <key name="attribute1" />
        <key name="attribute2" />
    </key>
    <key name="with_deep_attributes">
        <key name="attribute1" />
        <key name="attribute2">
          <key name="level1">
          <key name="level2">
          </key>
          </key>
        </key>
    </key>
  </custom-fields-texts>
</wpml-config>
It is also possible to use wildcards the same way as they are used for Admin texts:
- Match all subfields starting with title- using code:
<key name="title-*" /> - Match all subfields and is generally used to match an array index using code:
<key name="*" /> - To get
[{"title":"First title"},{"title":"Second title"}]use code Example of configuration file with wildcards
<wpml-config>
  <custom-fields-texts>
    <key name="key-name">
    <key name="*">
    <key name="title" />
    </key>
    </key>
  </custom-fields-texts>
</wpml-config>
3. Custom terms
The custom term name needs to be provided and also the action that WPML is expected to take: translate, copy, copy-once, ignore.
<wpml-config>
  <custom-term-fields>
    <custom-term-field action="copy">term_meta_A</custom-term-field>
    <custom-term-field action="translate">term_meta_B</custom-term-field>
    <custom-term-field action="ignore">term_meta_C</custom-term-field>
    <custom-term-field action="copy-once">term_meta_D</custom-term-field>
  </custom-term-fields>
</wpml-config>
This block will have to be nested under the <wpml-config> tag.
You can set the following translation options for custom fields:
- translate: allows your user to translate the value of the custom term. These terms are displayed on the Translation Editor screen and can be sent to any of the professional translation services.
- copy: this action copies the custom term value of the default language to the secondary languages. This means that updating the custom term value of the default language will always be copied to the secondary language. The custom terms set to copy do not show on the Translation Editor screen.
- copy-once: The value of the custom term is copied to the secondary language in the initial translation process. The custom terms that use the copy-once action will not appear on the Translation Editor screen. However, the user can change the custom term value of the secondary language to be different from the default language using the post editing screen.
- ignore: this action eliminates the custom term from being copied to the secondary language.
4. Custom types
The custom post types that WPML should translate.
<wpml-config>
  <custom-types>
    <custom-type translate="1">book</custom-type>
    <custom-type translate="1">DVD</custom-type>
  </custom-types>
</wpml-config>
You can add the “display-as-translated” attribute to the tag to show the post types in the default language if no translation exists.
<wpml-config>
  <custom-types>
    <custom-type translate="1" display-as-translated="1">movie</custom-type>
  </custom-types>
</wpml-config>
You can add the “automatic” attribute to the tag to exclude a post type from automatic translation when using the Translate Everything Automatically mode. Please note, if you use this attribute, your entire language configuration file will only work for WPML versions 4.5.0 and up.
<wpml-config>
  <custom-types>
    <custom-type translate="1" automatic="0">contact_form</custom-type>
  </custom-types>
</wpml-config>
5. Custom taxonomies
The custom taxonomies that your plugin might be using and that are already registered with WP.
<wpml-config>
  <taxonomies>
    <taxonomy translate="1">genre</taxonomy>
    <taxonomy translate="1">type</taxonomy>
    <taxonomy translate="0">publisher</taxonomy>
  </taxonomies>
</wpml-config>
Note: the taxonomies that don’t need translation can simple be omitted from this list.
You can add the “display-as-translated” attribute to the tag to show the taxonomies in the default language if no translation exists.
<wpml-config>
  <taxonomies>
    <taxonomy translate="1" display-as-translated="1">wild-west</taxonomy>
  </taxonomies>
</wpml-config>
6. Gutenberg blocks
With the Gutenberg editor, you build content using blocks.
You can specify which parts of your Gutenberg block needs to be translated by adding settings to wpml-config.xml.
Xpath is used to define parts of the text that need to be translated.
6.1 Registering Gutenberg blocks as translatable
Let us say that we have an image that is shown using the following code:
<!-- wp:image {"id":3} -->
<figure class="wp-block-image"><img src="http://example.com/wp-content/uploads/2018/07/figure-2.png" alt="Image alt text" class="wp-image-3"/><figcaption>Image Caption</figcaption></figure>
<!-- /wp:image -->
We want to translate the figcaption and the alt attribute values of this image.
To achieve this, the following code needs to be inserted into wpml-config.xml:
<wpml-config>
  <gutenberg-blocks>
    <gutenberg-block type="core/image" translate="1">
        <xpath>//figure/figcaption</xpath>
        <xpath>//figure/img/@alt</xpath>
    </gutenberg-block>
  </gutenberg-blocks>
</wpml-config>
Please bear in mind that the type is core/image and not wp:image since this is the value returned by the block API.
You can specify which Gutenberg block fields are links. WPML will then replace any links with their translations if they are available.
<wpml-config>
  <gutenberg-blocks>
    <gutenberg-block type="core/some-block" translate="1">
        <xpath type="link">//a/@href</xpath>
    </gutenberg-block>
  </gutenberg-blocks>
</wpml-config>
6.2 Translation of block attributes
Here is one example of a format for the definition of an editor block:
<wpml-config>
  <gutenberg-blocks>
    <gutenberg-block type="my-plugin/my-block" translate="1">
        <xpath label="My Block">//p</xpath>
        <key name="title" />
        <key name="foo">
            <key name="bar1" />
            <key name="bar2" />
        </key>
        <key name="/^[^_]\S+$/" search-method="regex" />
        <key name="something" search-method="wildcards" />
    </gutenberg-block>
  </gutenberg-blocks>
</wpml-config>
You can use the key element in the same way as it is used with the Admin texts / wp_options configuration. This also means that you can have key elements inside parent key elements.
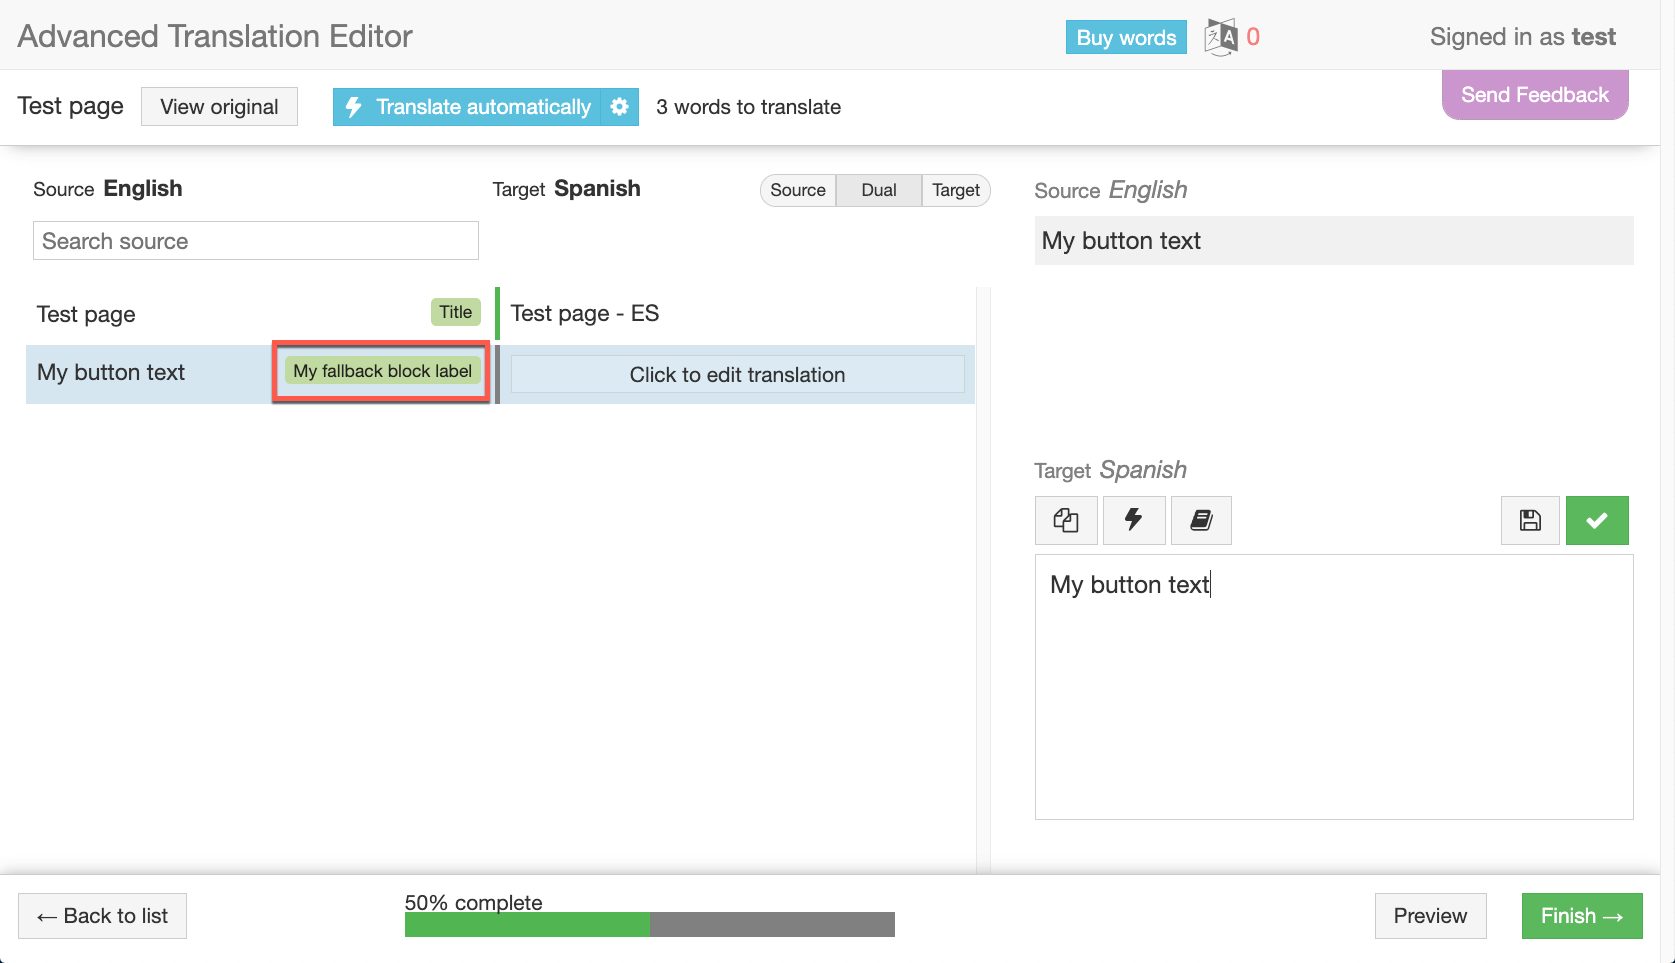
You can use the label attribute to add optional custom labels that display in the Advanced Translation Editor next to the block elements. When the label attribute is part of the gutenberg-block tag, it will be used as a fallback label for elements of the block that don’t have a specific label defined.
<wpml-config>
	<gutenberg-blocks>
		<gutenberg-block type="my-plugin/mybutton" translate="1" label="My fallback block label">
			<xpath>//span</xpath>
			<xpath>//a@href</xpath>
		</gutenberg-block>
	</gutenberg-blocks>
</wpml-config>
The attribute search-method can have one of two values:
- wildcards (default)
- regex.
Wildcards can be used in the same way as they are used for admin texts. This means that an asterisk (*) can be used in the name attribute. Here is an example of one block:
<!-- wp:my-plugin/my-block
    {
        "myp": {
            "mypTitle":"The title",
            "mypContent":"The Content",
            "_mypSystem:"Meta attribute to not translate"
        }
    }
/-->
We can set the block definition using a wildcard:
<wpml-config>
  <gutenberg-blocks>
    <gutenberg-block type="my-plugin/my-block" translate="1">
      <key name="myp">
          <key name="myp*" />
      </key>
    </gutenberg-block>
  </gutenberg-blocks>
</wpml-config>
This will allow us to translate “The title” and “The content” since these are the only attributes starting with myp.
The regex allows us to have a regular expression in the name attribute. This can be extremely useful for complex configurations. Here is an example of one block:
<!-- wp:my-plugin/my-block
    {
        "data": {
            "title":"The title",
            "_title":"e980759463943209f6f1ae09a239e353",
            "content":"The Content",
            "_content":"1502a7b825dfe7b789c63830609f1701"
        }
    }
/-->
We can set the block definition with a regular expression:
<wpml-config>
  <gutenberg-blocks>
    <gutenberg-block type="my-plugin/my-block" translate="1">
        <key name="data">
            <key name="/^[^_]\S+$/" search-method="regex" />
        </key>
    </gutenberg-block>
  </gutenberg-blocks>
</wpml-config>
This will allow us to translate “The title” and “The content” since these are the only attributes not starting with _.
Some block plugins save data in a URL-encoded JSON string inside a block’s attribute. The encoding attribute allows you to decode the string and register its subkeys for translation.
For example, the LazyBlocks plugin stores repeater field content in an encoded JSON string:
<!-- wp:lazyblock/testwpml {"name":"%5B%7B%22firstname%22:%22Shekhare%22,%22lastname%22:%22Bhandari%22%7D,%7B%22firstname%22:%22Compatibility%22,%22lastname%22:%22Escalation%22%7D%5D","blockId":"Z169b0O","blockUniqueClass":"lazyblock-testwpml-Z169b0O"} /-->
You can register the firstname and lastname subkeys using the following XML configuration:
<wpml-config>
  <gutenberg-blocks>
    <gutenberg-block type="lazyblock/team" translate="1">
      <key name="name" encoding="json">
        <key name="*">
          <key name="firstname" />
          <key name="lastname" />
        </key>
      </key>
    </gutenberg-block>
  </gutenberg-blocks>
</wpml-config>
6.3 Block Namespace
You can have a global configuration for the block namespace.
If the block configuration is the same for all blocks in a namespace it can be written like this:
<wpml-config>
  <gutenberg-blocks>
    <gutenberg-block type="my-plugin" translate="1">
        <key name="data">
            <key name="/^[^_]\S+$/" search-method="regex" />
        </key>
    </gutenberg-block>
  </gutenberg-blocks>
</wpml-config>
6.4 Automatically converting IDs in blocks
The ID conversion is versatile and tries to adapt to most possible formats of IDs (single ID, list of IDs, serialized array, JSON encoded array).
Considering the following block:
<!-- wp:foo/form {"ids":[27,28]} -->
<div class="wp-block-foo-form-wrap">
  <form class="foo-form" action="" method="post">
    <input type="hidden" name="foo_form_post_ids" value="27,28" />
    <input type="submit" />
  </form>
</div>
<!-- /wp:foo/form -->
We can declare, as post IDs, the block attribute ids and the HTML tag attribute value foo_form_post_ids as below:
<gutenberg-block type="foo/form" translate="0">
  <key name="ids">
      <key name="*" type="post-ids" sub-type="post" />
  </key>
  <xpath type="post-ids" sub-type="post">//*[@name="foo_form_post_ids"]/@value</xpath>
</gutenberg-block>
And the block will be converted with highest priority on the filter render_block_data as below:
<!-- wp:foo/form {"ids":[42,43]} -->
<div class="wp-block-foo-form-wrap">
    <form class="foo-form" action="" method="post">
        <input type="hidden" name="foo_form_post_ids" value="42,43" />
        <input type="submit" />
    </form>
</div>
<!-- /wp:foo/form -→
You can use the following config attributes:
- type – can be post-ids or taxonomy-ids
- sub-type (optional): can be the specific entity of the type if it’s already known. For instance, product for the Product custom post type. If not defined, the specific entity will be guessed.
7. Admin texts / wp_options
Strings that are part of the options that the plugins or themes save in the wp_options table.
When themes and plugins use get_option, they read values from the wp_options table. WPML can filter these calls and provide translation to the values of these options.
This works if the wp_option record is a simple string but also when it’s a serialized array.
To translate a single option, add a key entry under admin-texts. To translate a serialized array, add several keys under a key, like you can see in my_plugin_options in the example below.
<wpml-config>
  <admin-texts>
    <key name="my_plugins_options">
      <key name="option_name_1" />
      <key name="option_name_2" />
    <key name="options_group_1">
      <key name="sub_option_name_11" />
      <key name="sub_option_name_12" />
    </key>
      <key name="options_group_2">
      <key name="sub_option_name_21" />
    <key name="sub_option_name_22" />
    </key>
    </key>
  <key name="simple_string_option"/>
</admin-texts>

</wpml-config>
It’s possible to use the wildcard * in sub-keys like the following case.
<wpml-config>
  <admin-texts>
    <key name="testing_option">
      <key name="*"/>
    </key>
  </admin-texts>
</wpml-config>
It’s equal to this code:
<wpml-config>
  <admin-texts>
    <key name="testing_option">
      <key name="sub_key_1"/>
      <key name="sub_key_2">
        <key name="sub_sub_21">
          <key name="sub_sub_211"/>
        </key>
        <key name="sub_sub_21"/>
        </key>
      <key name="more_sub_keys"/>
    </key>
  </admin-texts>
</wpml-config>
Please note that the wildcard * does NOT work in parent keys:
<wpml-config>
  <admin-texts>
    <key name="some_option_*" />
    <key name="*"/>
  </admin-texts>
</wpml-config>
8. Language switcher configuration
Enables a specific configuration for the WPML built-in language switcher. It can also be used for resetting the language switcher configuration if it was changed from the backend (from its initial values).
To see new changes, make sure to click the Restore default button on the bottom of the WPML → Languages page.
<wpml-config>
  <language-switcher-settings>
    <key name="additional_css">{inline CSS styles}</key>
    <key name="link_empty">{0 or 1}</key>
    <key name="copy_parameters">{parameter1, parameter2}</key>
    <key name="sidebars">
        <key name="{sidebar slug}">
            <key name="display_flags">{0 or 1}</key>
            <key name="display_names_in_current_lang">{0 or 1}</key>
            <key name="display_names_in_native_lang">{0 or 1}</key>
            <key name="display_link_for_current_lang">{0 or 1}</key>
            <key name="widget_title">{widget title}</key>
            <key name="template">{template slug}</key>
            <!-- color picker keys -->
            <key name="background_normal">#{hex color}</key>
            <key name="border_normal">#{hex color}</key>
            <key name="font_current_normal">#{hex color}</key>
            <key name="font_current_hover">#{hex color}</key>
            <key name="background_current_normal">#{hex color}</key>
            <key name="background_current_hover">#{hex color}</key>
            <key name="font_other_normal">#{hex color}</key>
            <key name="font_other_hover">#{hex color}</key>
            <key name="background_other_normal">#{hex color}</key>
            <key name="background_other_hover">#{hex color}</key>
        </key>
    </key>
    <key name="statics">
        <key name="footer">
            <key name="show">{0 or 1}</key>
            <key name="display_flags">{0 or 1}</key>
            <key name="display_names_in_current_lang">{0 or 1}</key>
            <key name="display_names_in_native_lang">{0 or 1}</key>
            <key name="display_link_for_current_lang">{0 or 1}</key>
            <key name="template">{template slug}</key>
            <!-- color picker keys -->
            <key name="background_normal">#{hex color}</key>
            <key name="border_normal">#{hex color}</key>
            <key name="font_current_normal">#{hex color}</key>
            <key name="font_current_hover">#{hex color}</key>
            <key name="background_current_normal">#{hex color}</key>
            <key name="background_current_hover">#{hex color}</key>
            <key name="font_other_normal">#{hex color}</key>
            <key name="font_other_hover">#{hex color}</key>
            <key name="background_other_normal">#{hex color}</key>
            <key name="background_other_hover">#{hex color}</key>
        </key>
        <key name="post_translations">
            <key name="show">{0 or 1}</key>
            <key name="display_flags">{0 or 1}</key>
            <key name="display_names_in_current_lang">{0 or 1}</key>
            <key name="display_names_in_native_lang">{0 or 1}</key>
            <key name="display_link_for_current_lang">{0 or 1}</key>
            <key name="display_before_content">{0 or 1}</key>
            <key name="display_after_content">{0 or 1}</key>
            <key name="template">{template slug}</key>
            <key name="availability_text">{string like "See post translations: %s"}</key>
        </key>
        <key name="shortcode_actions">
            <key name="display_flags">{0 or 1}</key>
            <key name="display_names_in_current_lang">{0 or 1}</key>
            <key name="display_names_in_native_lang">{0 or 1}</key>
            <key name="display_link_for_current_lang">{0 or 1}</key>
            <key name="template">{template slug}</key>
            <!-- color picker keys -->
            <key name="background_normal">#{hex color}</key>
            <key name="border_normal">#{hex color}</key>
            <key name="font_current_normal">#{hex color}</key>
            <key name="font_current_hover">#{hex color}</key>
            <key name="background_current_normal">#{hex color}</key>
            <key name="background_current_hover">#{hex color}</key>
            <key name="font_other_normal">#{hex color}</key>
            <key name="font_other_hover">#{hex color}</key>
            <key name="background_other_normal">#{hex color}</key>
            <key name="background_other_hover">#{hex color}</key>
        </key>
    </key>
  </language-switcher-settings>
</wpml-config>
Not all of these sections have to be present in the configuration file but just the ones that apply to your plugin or theme.
Using WPML language configuration file with child themes
If you are using a child theme, the language configuration file of the parent theme overrides the one found in the child theme. WPML provides a configuration page that allows you to easily override this with any custom settings.
Let us consider an example where the language configuration file of the parent theme is setting the custom post type “Property” to be translatable.
If you are using a child theme and want to set the custom post type “Property” to be non-translatable, navigate to the WPML → Settings page and click on the Custom XML Configuration tab. Use the editor to set the custom post type “Property” to be non-translatable. Simply, set the translate attribute value to 0 instead of 1.
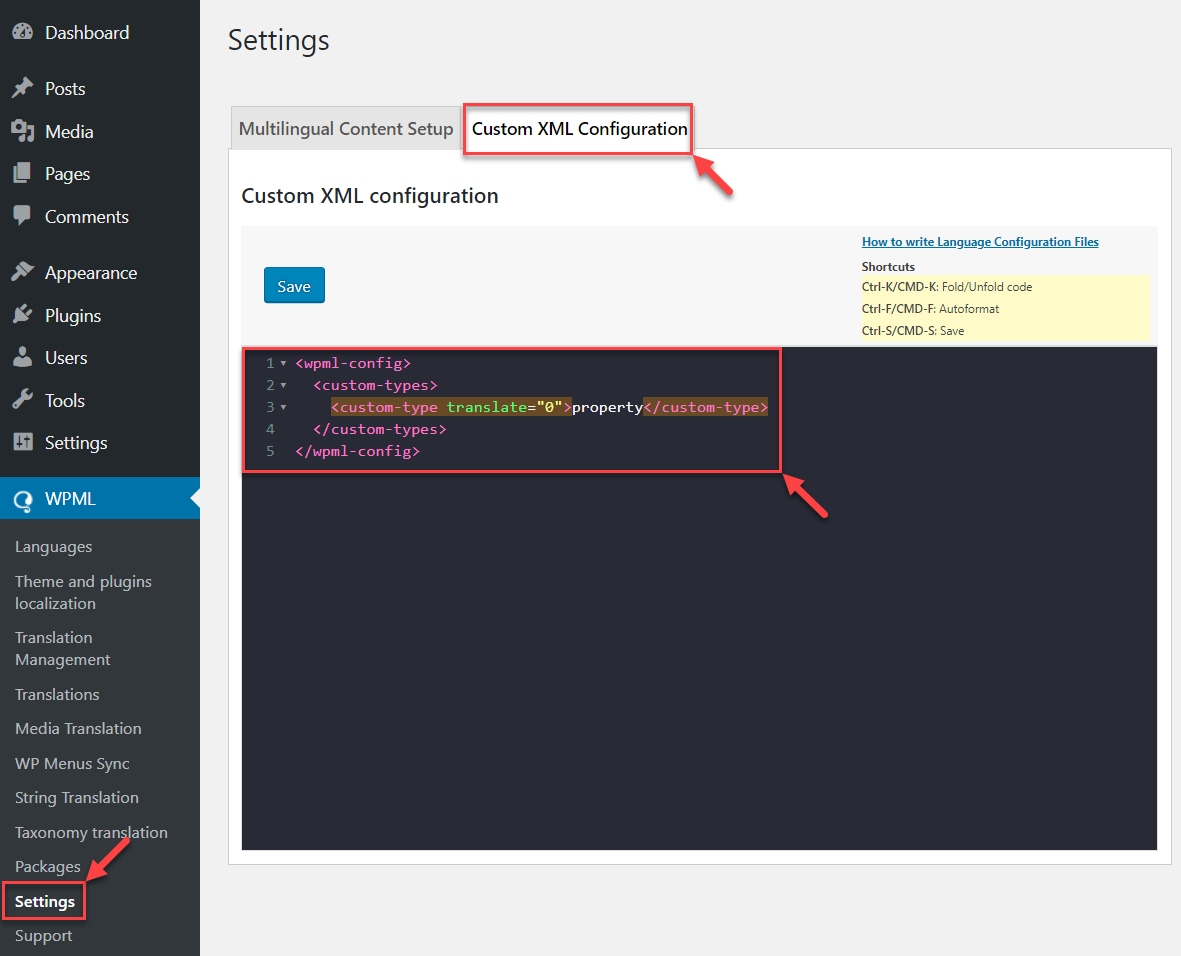
The settings in the Custom XML Configuration tab are prioritized over the settings in the language configuration file in the parent theme.