Starting from WPML 4.4.4, you can use the wpml-config.xml file to define the widgets for Elementor, Beaver Builder, SiteOrigin, and Cornerstone page builders.
If you have a custom Elementor, Beaver Builder, SiteOrigin, or Cornerstone widget, instead of using PHP integration (check here for Elementor example), you can register the widget for translation using the wpml-config.xml file.
Throughout this tutorial, we’ll demonstrate how to register Elementor widgets within the wpml-config.xml file. This applies to new Elementor widgets, new Elementor PRO widgets, and any other Elementor addon.
On This Page:
- How to Find a Widget’s Registration Information
- Registering Simple Widgets
- Registering Widgets with Repeater Fields
- Registering Widgets with Both Simple and Repeater Fields
- Registering Other Types of Page Builder Content
How to Find a Widget’s Registration Information
To be able to register a widget within the wpml-config.xml file, you first need to find some basic information about it.
You can easily get this information by using a plugin like JSM Show Post Metadata. This plugin shows post metadata and their unserialized values in a metabox at the bottom of post editing pages.
Alternatively, you can use the following steps to get this information:
- Go to the WPML → Settings page, scroll to the Custom Fields Translation section and click the Show system field link.
- Set _elementor_data custom field to Translate.
- Create a new page and add only the Elementor widget you wish to register. Save the page.
- Go to WPML → Settings and in the Translation Editor section temporarily activate the Classic Translation Editor option.
- Try to translate the page you created in Step 3 using the Classic Translation Editor and you’ll notice a serialized array, like this:
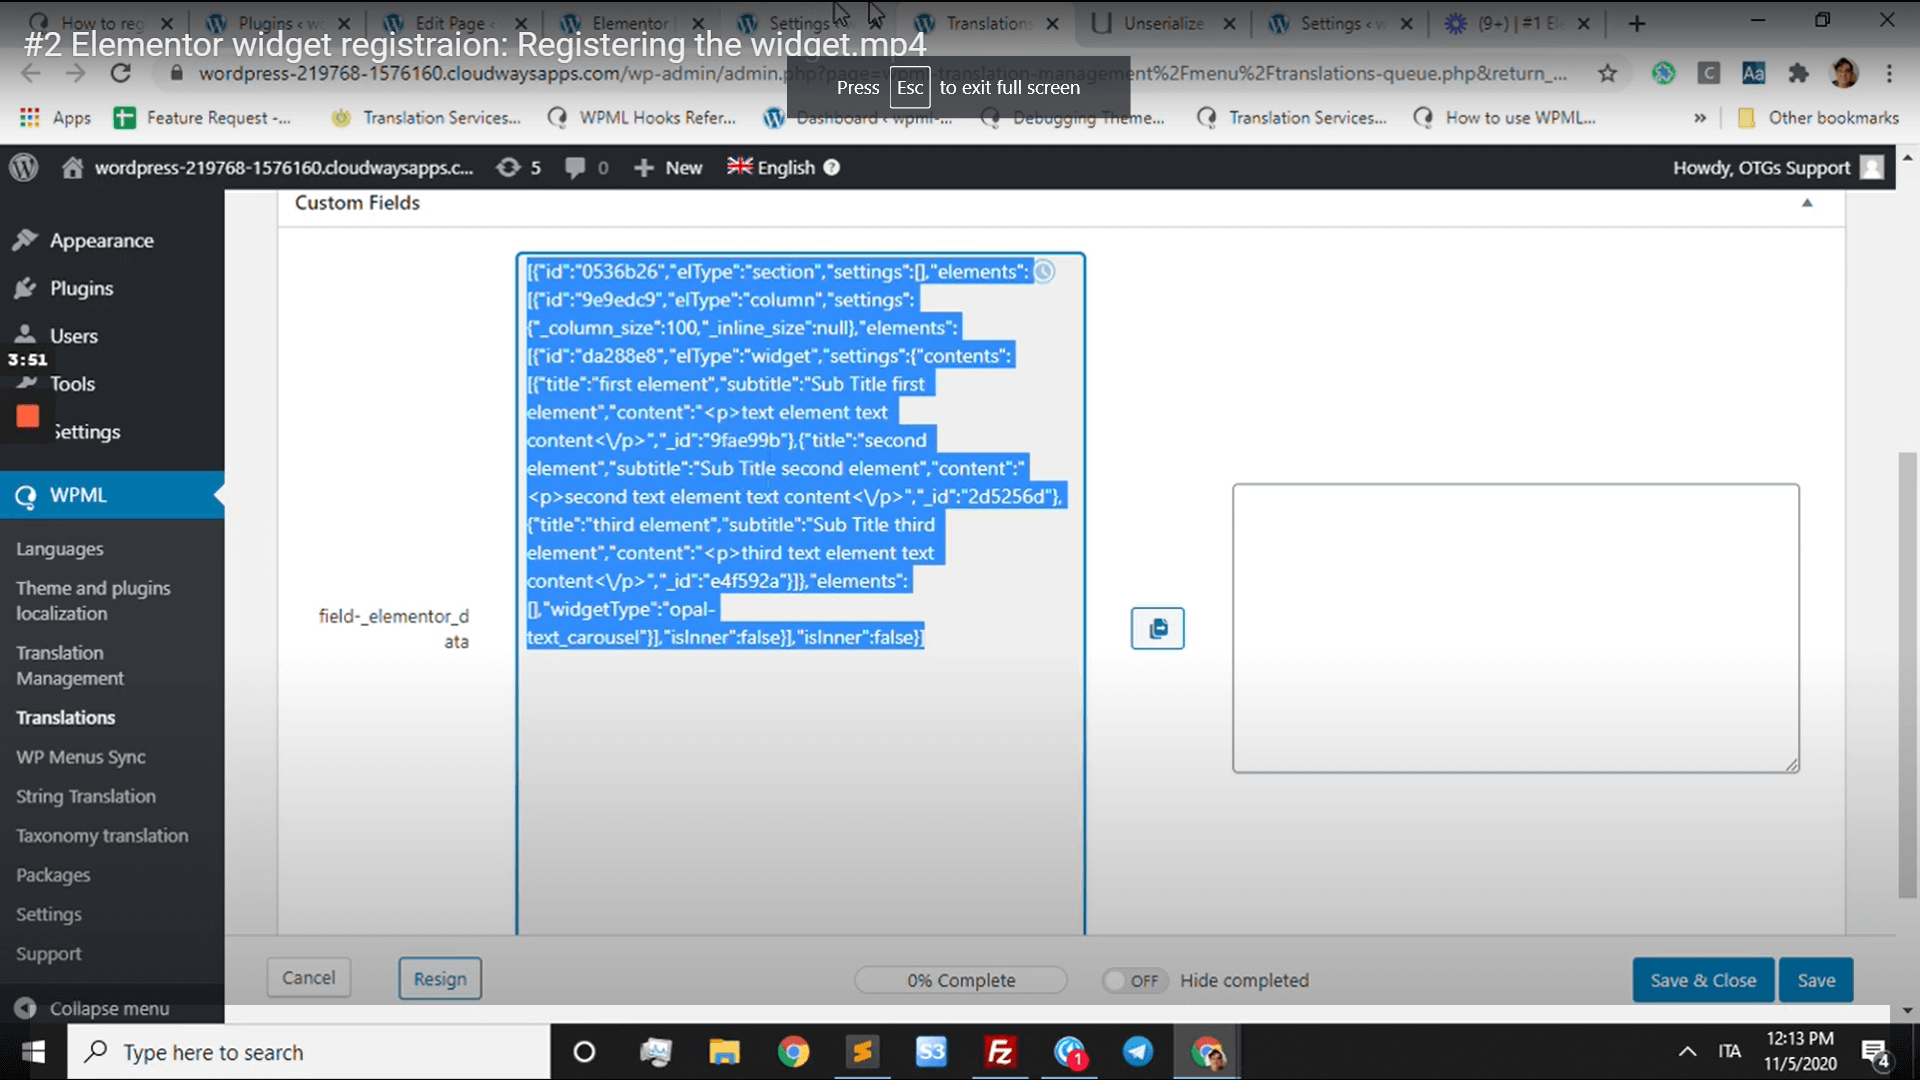
- Copy the content of the serialized array.
- Use your preferred unserialize tool to better see how the widget is outputting its content. In our case, we used the Unserialize site.
Here is the explanation of the array’s content you will see:
- [widgetType] contains the name inserted in the widget’s tag name attribute.
- The actual fields will be inside an Array and you can find them by searching for [0] which will bring the content of the first element of the array.
- The field value will be the name inside the brackets that will contain the field’s name. For example:[title] => this is a field title. In this case, “title” is the text you need.
- “Items of” will get its value from the element that creates the array. For example: [contents]=> array. In this case, “contents” is the text you need.
Once you have this information, you can proceed with actually registering the widget for translation.
Registering Simple Widgets
The following video walks you through an example of registering a simple Elementor widget:
The following example illustrates how to register a simple widget. A simple widget here means that the widget has no repeater fields.
<wpml-config>
	<elementor-widgets>
		<widget name="heading">
			<conditions>
				<condition key="widgetType">heading</condition>
			</conditions>
			<fields>
				<field type="Heading" editor_type="LINE">title</field>
				<field type="Heading: Link URL" editor_type="LINK">link>url</field>
			</fields>
		</widget>
	</elementor-widgets>
</wpml-config>
Let’s go through the structure of the given example:
- Start with the
<elementor-widgets>tag. This tells WPML which page builder widgets you are going to register. It can be one of these:<elementor-widgets>: this must be used if you’re using Elementor, Elementor PRO or any other Elementor addon.<beaver-builder-widgets>: this must be used if you’re using Beaver Builder Lite, premium Beaver Builder or any other Beaver Builder addon.<siteorigin-widgets>: this must be used if you’re using the SiteOrigin page builder.<cornerstone-widgets>: and this one must be used for Cornerstone page builder that comes with X theme or PRO theme.
- Add your widgets:
<widget name="widget_name">where widget_name is the name used to register the widget in the page builder.<conditions>(optional): under conditions, you add a condition with a key equal to the widget name. It can be used when the widget name is different from the widget key in the data, but it’s usually not needed.
- Add the fields of the widgets, wrapping them in a
<fields>tag:- field: The id of the field. This is the same as the id used when adding a control via the Control_stack::add_control function.
- type (optional): The type of field. This is the text displayed in the WPML Advanced Translation Editor or Classic Translation Editor to help the translator know what field is being translated.
- editor_type (optional): This is the type of text field used in the WPML Classic Translation Editor. Valid values are LINE, AREA, LINK, and VISUAL. It defaults to LINE if missing.
- key_of (optional): This is only used for <field> tags that have an array inside a <fields-in-item> tag.
You can use these elements to register a simple widget with any number of fields.
Registering Widgets with Repeater Fields
The following video walks you through an example of registering an advanced Elementor widget with repeater fields:
For the widgets that have repeater fields, you need to wrap the fields in <fields-in-item items_of="tabs"> tag (where tabs is the name of the widget with repeated fields). Check out this example:
<widget name="accordion">
	<fields-in-item items_of="tabs">
		<field type="Accordion: Title" editor_type="LINE">tab_title</field>
		<field type="Accordion: Content" editor_type="VISUAL">tab_content</field>
	</fields-in-item>
</widget>
In some cases, the widget can have multiple repeater fields. Consider the following data structure from the Table widget from Ultimate Addons for Elementor as an example:
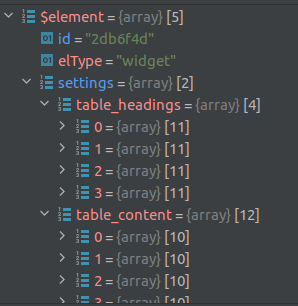
To register this widget, please see the following example:
<widget name="uael-table">
	<fields-in-item items_of="table_content">
		<field type="The Cell text" editor_type="LINE">cell_text</field>
	</fields-in-item>
	<fields-in-item items_of="table_headings">
		<field type="The Heading text" editor_type="LINE">heading_text</field>
	</fields-in-item>
</widget>
Registering Widgets with Both Simple and Repeater Fields
Note, widgets can have both types: fields and fields-in-item. Check out this example for a widget that uses both:
<widget name="price-table">
	<fields>
		<field type="Price Table: Heading" editor_type="LINE">heading</field>
		<!-- ... -->
	</fields>
	<fields-in-item items_of="features_list">
		<field type="Price table: text" editor_type="LINE">item_text</field>
	</fields-in-item>
</widget>
Registering Other Types of Page Builder Content
See our documentation on registering page builder content in your language configuration file for more on registering strings, shortcodes, and more.